 Hermit's Free Library MS-Word
 Hermit's Free Library MS-Word
This article covers horizontal and vertical text alignments and indentations and includes decimal tabs for aligning decimal numbers.
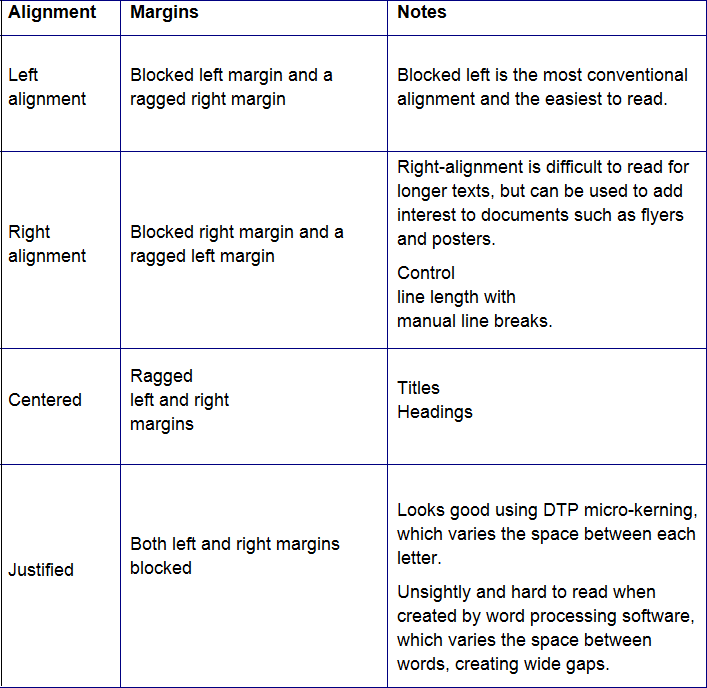
There are three common horizontal text alignments, four including full justification. Here's a summary of their appearances and how they're used.

When aligning text in a paragraph don't waste time selecting the paragraph or any of its text. Just move the insertion point anywhere inside the paragraph and give the command.
If you're aligning text using direct formatting (as opposed to using a Style), you can use the alignment tools in the Paragraph group of the Home tab. The keyboard commands are very fast and easy for one or many paragraphs. One hand for the keyboard and one hand for the mouse is a very effective way of formatting, although Styles are ultimately the best.
By default, pages are top-alignedj, but we can modify them for things like title pages (usually centered vertically) first pages of chapters (frequently shortened and aligned to bottom of the page).
Positioning text vertically using empty paragraphs is not a good way to go because:
Instead, use the Vertical Alignment command which automatically adjusts text to the page's vertical center each time changes are made.
Vertical Alignment is one of the most elusive commands in the MS-Word ribbons and menus until you remember that it is a Page command.
When the selected text is centered, Word automatically puts it on a page by itself. Text that was before or after the selected text gets pushed to the pages before and after the vertically-aligned page.
First important rule is never use the spacebar to position text horizontally. That was Ok on typewriters with their non-proportional typeface, but with proportional typeface, indentations using spaces will vary widely, even when equal numbers of spaces are used.
In the age of typewriters, tabs served to indent paragraphs, and position text horizontally, particularly to arrange text in columns.
Now, tabs have been surpassed by the powerful alignment methods available in word processing software.
Modern word processing programs offer several variations of indentation which can be applied even in "mix and match" fashion if required.
Examples of first-line and hanging line paragraph indentation:

Here are the first line and hanging line indentations with increased left indentation:

First line and hanging line indentations with increased right indentation:

Finally, first line and hanging line indentations with increased left and right indentation:

There are several ways to apply indentation formatting to paragraphs:
Paragraph Dialog Box
The Paragraph dialog box provides access to all indentation options. Launch it from the Paragraph group on the Home tab, or use its keyboard shortcut: Alt-O-P.
Paragraph Group
The Paragraph group includes buttons for Increase and Decrease left indent, but not for increase/decrease right indent or first line and hanging indents.
The Ruler
The Ruler includes four indent markers: left, first line, hanging indent, and right.
Although dragging the indent markers using the mouse is a quick way to make adjustments, results can be unexpected or inconsistent until you've had a bit of practice. If things go wrong, remember Ctrl-Z (Undo).
To toggle the Ruler on and off, use the View Ruler button. It's that little white blob directly above the upper arrow of the vertical scroll bar. (Don't forget to remove the Ruler when it's unused).
Styles
The reason first line and hanging indents are not found on the Ribbon is because they are best applied as part of a Style, and not through direct formatting. See Formatting with Styles.
As already noted, for indentation, tabs have been replaced by the alignment and indentation tools discussed above.
Tabs should also be considered obsolete for positioning text into rows and columns because tables offer far greater flexibility and convenience.
There is one job for which Tabs still rule: lining up columns of decimal numbers. Here's how to set up decimal tabs: